Flooring Installation: Materials, Grout Joints and Floor Profiles
Proper flooring installation depends on more than the selected tile or stone. This guide explains substrate preparation, adhesives, grout, spacers, leveling systems, movement joints and transition profiles used in residential flooring.
Flooring installation is one of the most visible stages of interior finishing. Even expensive porcelain, marble or stone can produce poor results when the substrate, adhesive, joints or transitions are incorrectly executed.
The exact installation system depends on the flooring material, substrate, tile size, location and manufacturer's specifications.
1. Preparing the Floor
Before installation, the substrate must be suitable for the selected flooring system.
The contractor should check:
Floor levels.
Surface flatness.
Cleanliness and stability.
Cracks or defects.
Required slopes in wet areas.
Finished Floor Level – FFL.
Thicknesses of adjacent flooring materials.
The 2026 TCNA Handbook emphasizes that tile installation methods require a properly designed and prepared substrate and includes guidance for substrate flatness, grout joints and wet areas.
2. Setting Out the Flooring
Before fixing tiles, the layout should be established.
Setting out determines where tiles start, where cuts occur and how joints align with walls, doors and architectural elements.
For large-format porcelain or marble, poor setting out can leave narrow cuts in highly visible locations.
The designer and contractor should confirm the layout before installation begins.
3. Tile Adhesive or Setting Mortar
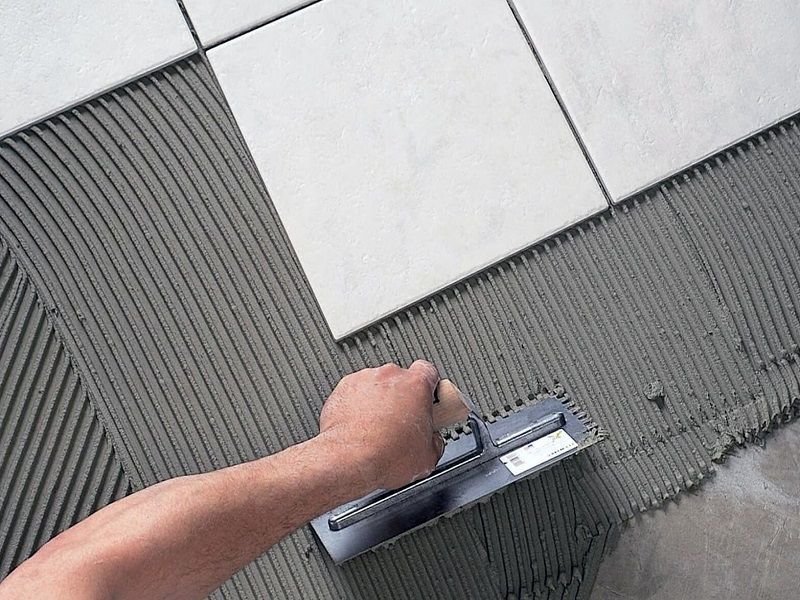
Porcelain and ceramic tiles are typically installed using an appropriate tile-setting mortar or adhesive selected for the tile, substrate and application.
The adhesive is generally spread using a notched trowel, which helps create controlled mortar ridges.
Large-format tiles may require specific installation techniques and suitable products to achieve the required support and coverage.
The manufacturer's technical data sheet should always determine mixing, application thickness, working time and substrate requirements.
4. Spacers and Tile Leveling Systems
Small accessories have a major effect on the final appearance.
Tile spacers help maintain consistent grout-joint widths between tiles.
Tile leveling clips and wedges can assist installers in controlling lippage between adjacent tiles, particularly with large-format flooring.
A leveling system does not replace proper substrate preparation; an uneven screed should be corrected rather than relying on clips to compensate for major irregularities.
5. Grout Joints
The visible joints between tiles are filled with grout after the tiles have been installed and the setting material has reached the required condition.
Common grout systems include:
Cementitious grout.
Improved polymer-modified cementitious grout.
Epoxy grout for applications where its performance characteristics are required.
Grout color also affects the design: a similar color creates a more continuous appearance, while contrasting grout emphasizes the tile pattern.
Tiles should not simply be installed tightly together without considering the required joints.
6. Movement and Expansion Joints
A grout joint and a movement joint are not the same thing.
Movement joints are designed to accommodate movement caused by factors such as temperature, moisture and loading.
TCNA recommends providing movement accommodation in tile installations. In smaller rooms, perimeter movement space may sometimes be concealed beneath the skirting, while larger areas require appropriately located movement joints.
Movement joints should also coordinate with structural or existing expansion joints rather than simply covering them with rigid tile.
7. Transition Profiles Between Materials
Flooring often changes from one material to another, for example:
Porcelain → Wood
Marble → CarpetTile → LVTTransition profiles can protect exposed tile edges and provide a clean connection between materials.
Profiles are available for:
Same-height floors.
Floors with different heights.
Edge protection.
Movement joints.
Decorative separation.
According to Schluter, floor profiles can protect tile edges against chipping and create smooth transitions between adjacent floor coverings.
Common profile materials include aluminum, stainless steel and other manufactured finishes.
8. Skirting and Perimeter Details
Skirting forms the visual transition between the floor and wall and also protects the lower wall.
Depending on the design, it may be made from:
Porcelain.
Marble or stone.
Wood or MDF.
Metal.
Other architectural finishes.
Perimeter movement requirements must still be considered behind or alongside the selected detail.
9. Flooring Accessories
Typical accessories used during flooring installation include:
Tile spacers.
Leveling clips.
Leveling wedges.
Transition profiles.
Movement-joint profiles.
Edge-protection profiles.
Stair nosing.
Grout.
Sealants where specified.
Skirting.
These components should be selected during the detailing stage rather than treated as last-minute site decisions.
10. Final Inspection
Before accepting the flooring, check:
Floor level and flatness.
Tile alignment.
Joint consistency.
Lippage.
Hollow or poorly bonded areas where applicable.
Tile cuts.
Grout quality.
Transition profiles.
Skirting.
Movement joints.
Damage, scratches and stains.
The completed floor should then be protected from other construction activities until handover.
Conclusion
Successful flooring installation depends on the entire system, not only the visible finish.
The substrate, adhesive, layout, spacers, grout, movement joints, transition profiles and skirting all contribute to the final result.
For architects and interior designers, details such as floor levels, material thicknesses, joints and transition profiles should be coordinated before installation begins, especially where different flooring materials meet.
References
Tile Council of North America (TCNA) — 2026 Handbook for Ceramic, Glass and Stone Tile Installation: https://tcnatile.com/products/publications/2026-tcna-handbook-for-ceramic-glass-and-stone-tile-installation/
Tile Council of North America — Movement Joint Placement: https://tcnatile.com/resource-center/faq/placement/
Schluter — Floor Profiles and Transitions: https://www.schluter.com/schluter-us/en_US/Profiles/For-Floors/c/P-FF
Schluter — Movement Joint Profiles: https://www.schluter.com/schluter-us/en_US/Profiles/Movement-Joint-Profiles/c/P-MJ
MAPEI — Tile Installer's Manual: https://cdnmedia.mapei.com/docs/librariesprovider59/line-technical-documentation-documents/tile-installers-manual254cb329-719b-4113-92b0-2ff2d9709685.pdf
Related articles

Key Construction Project Terms: Design, Pricing and Execution
Construction projects use a wide range of technical and commercial terms. This practical glossary explains common terminology used in design, tendering, pricing, contracting and site execution.
Read article →
Plastering Works in Residential Construction: Key Steps and Quality Checks
Plastering transforms unfinished blockwork into level surfaces ready for paint, tiles and other finishes. This guide explains the main plastering stages, preparation requirements and common quality issues in residential construction.
Read article →
Wall Painting Stages: From Surface Preparation to Final Coat
Good wall painting depends on much more than the final color. This guide explains the main painting stages after plastering, including surface preparation, putty, sanding, primer, paint coats and final inspection.
Read article →